How to Fill Out the DS-160 Form for US Visa – Complete Guide

If you are trying to understand how to fill DS-160 form for US visa, you have come to the right place. The DS-160 is the official Online Nonimmigrant Visa Application form required by the US Department of State for every person applying for a US visa — whether it is a B1 business visa, B2 tourist visa, F1 student visa, or any other nonimmigrant category. It is the first and most important document in your visa process, and filling it correctly makes a direct difference to your interview outcome.

DS-160 Form – All 8 Sections at a Glance 2026 | Roamvisa.com
At Roamvisa.com, we have helped hundreds of Indian travelers complete the DS-160 form without errors. Poor finances or weak applications do not cause most rejections and delays at the US consulate- avoidable mistakes in the DS-160 form itself cause them. A name that does not match the passport. An employment gap left unexplained. A photo that fails the specifications. These are fixable problems, and this guide fixes them for you. This complete guide covers every section of the DS-160 form with clear explanations, the most common mistakes and exactly how to avoid them, the full photo requirements, a pre-submission checklist, and honest answers to the questions Roamvisa.com receives most often from Indian applicants
What Is the DS-160 Form and Who Needs It
The DS-160, officially titled the Online Nonimmigrant Visa Application, is the standard US Department of State form used to collect information from all nonimmigrant visa applicants. It replaced earlier paper-based forms and must be completed entirely online at the official US Department of State website: Ceac.state.gov.
Every person applying for a nonimmigrant US visa needs to complete a DS-160, including children traveling with parents. Each applicant submits their own individual form. The completed form generates a confirmation page with a barcode that you must print and bring to your visa interview at the US Embassy or Consulate.
Who needs to fill the DS-160: All nonimmigrant visa applicants including B1/B2 tourist and business visa, F1 student visa, H1B work visa, J1 exchange visitor visa, L1 intracompany transfer, and all other nonimmigrant categories.
Who does NOT use DS-160: US citizens, lawful permanent residents (green card holders), and applicants for immigrant visas who use the DS-260 form instead.
Before You Start – What You Need to Have Ready
Gathering the right documents before opening the DS-160 saves you significant time and prevents errors caused by filling in sections from memory. The form has a timeout feature and will log you out after inactivity, so being prepared is important.
- Valid passport — number, issue date, expiry date, issuing authority
- Previous passports if you have traveled to the US before
- US visa photo — 2×2 inch, white background, taken within last 6 months
- Travel dates and itinerary — planned arrival and departure dates
- US address where you will stay — hotel name and address, or host details
- US contact person — name, address, phone number of your contact in America
- Employment details — current employer name, address, supervisor name, phone
- Education history — names of institutions, dates attended, field of study
- Previous US visa information if you have visited before
- Social media usernames — the DS-160 now requires your social media handles
One critical tip from Roamvisa.com: note down your Application ID the moment you start the form. This ID allows you to retrieve your application if it times out or if you need to return to it later. The ID appears at the top of the form screen. Save it immediately.
DS-160 Section by Section – Complete Walkthrough
Section 1 – Personal Information Part 1
This section asks for your full name exactly as it appears on your passport. This means surname first, then given names. Do not abbreviate. Do not use initials. If your passport shows your middle name, include it. Mismatches between the DS-160 and your passport are the single most common reason applications get delayed at the consulate window.
You will also enter your nationality, national identification number (Aadhar or PAN card number for Indian applicants), and your place of birth. City of birth should match your birth certificate if possible. Country of birth is India for most readers of this guide.
Section 2 – Personal Information Part 2
This section covers your ethnic and racial background, languages you speak, immigration violations if any, and whether you are a member of any organization. Answer all questions carefully and honestly. The languages field should include all languages you speak, not just your strongest. For most Indian applicants this will include English, Hindi, and your regional language.
Section 3 – Travel Information
Enter your intended date of arrival in the US and length of stay. If you do not have exact dates booked yet, provide your best estimate. You can explain at the interview if plans have changed. The purpose of the trip needs to be accurate — B2 is tourism/vacation, B1 is business meetings, and so on. Mixing these up is a common error.
The US address field requires the address where you will stay. If staying at a hotel, enter the hotel name and address. If staying with a friend or relative, enter their address. If you have not booked accommodation yet, use the address of a reputable hotel in your destination city — you can explain your actual plans at the interview.
Section 4 – Travel Companions
If you are traveling alone, select No for Are you traveling as part of a group or organization. If traveling with family, you will need to list each companion. Each companion still needs their own separate DS-160 form. This section is straightforward for solo travelers.
READ MORE: USA Visa Process For Indians Step-By-Step Guide
Section 5 – Previous US Travel
This section is important and must be answered with complete honesty. Have you been to the US before? If yes, enter your previous visa number, dates of last visit, and length of stay. Have you ever been refused a US visa or been refused admission at a US port of entry? If yes, you must disclose this. Non-disclosure of previous refusals is treated as misrepresentation and can result in permanent visa ineligibility.
Indian applicants who had a B1/B2 visa that expired should include all previous US visits. Even visits many years ago must be disclosed if asked. The US immigration system maintains detailed entry and exit records.
Section 6 – US Contact Information
Enter the name, address, and phone number of a person in the United States who you will be in contact with during your visit. This can be a friend, relative, business contact, or hotel. If you are traveling purely as a tourist with no personal contacts in the US, using your hotel’s contact details is acceptable. The consular officer needs to see that your trip is planned and you have a point of contact.
Section 7 – Family Information
Parents’ full names, dates of birth, and whether they are US citizens or residents. Spouse or partner information if you are married. You must also declare whether you have any immediate relatives currently in the United States — siblings, children, parents. Having relatives in the US is not automatically a negative factor, but undisclosed relatives are a serious problem. List all US-based relatives accurately.
Section 8 – Present Work, Education, and Training
Current employer name, address, supervisor name and telephone, your job title, a brief description of duties, and start date. If you are self-employed, note that clearly. If you are currently studying, provide your institution details. If unemployed, select unemployed and provide the date your last employment ended.
Previous employment — the form asks for the previous five years of employment history. There should be no unexplained gaps. If you were between jobs, note it as unemployed with dates. If you were studying, note the institution. Consular officers look specifically for unexplained time gaps in employment history.
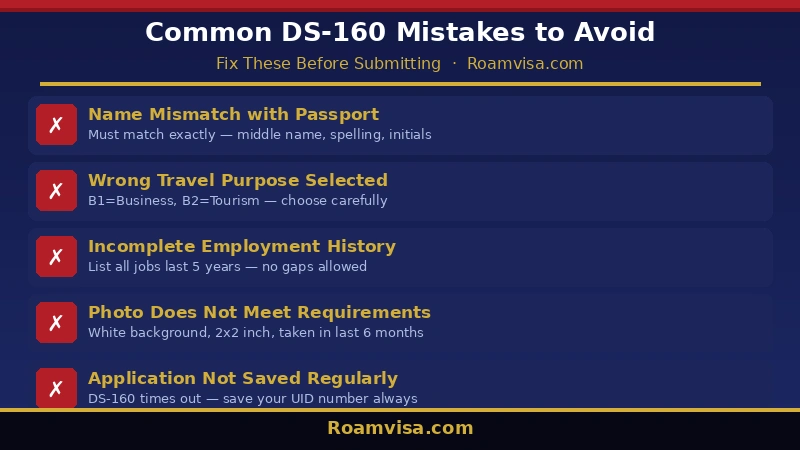
5 Common DS-160 Mistakes That Cause Delays or Rejection 2026 | Roamvisa.com
Most Common DS-160 Mistakes and How to Avoid Them
Mistake 1 — Name Does Not Match Passport
This is the most frequent error Roamvisa.com sees. Your name on the DS-160 must match your passport exactly — spelling, spacing, middle names. If your passport shows KUMAR RAJESH ANIL, your DS-160 must show the same. Not RAJESH KUMAR, not RAJESH ANIL KUMAR. Exactly as printed in your passport, character by character.
Mistake 2 — Wrong Visa Category Selected
B1 and B2 are different visa categories with different purposes. B1 is for business activities — attending meetings, conferences, negotiating contracts. B2 is for tourism, visiting family, or medical treatment. Many Indian applicants mix these up. If you are going for a holiday, select B2. If you are attending a business conference and also doing some tourism, select B1/B2 combined. Read the category descriptions carefully before selecting.
Mistake 3 — Gaps in Employment or Education History
The DS-160 requires a complete history without unexplained gaps. If there is a period between two jobs or after education where you were not working, you must account for it. Options include listing the period as unemployed, noting it as a career break, or explaining a period of freelance work. Any unexplained gap of more than a few months raises questions at the interview.
Mistake 4 – Photo Does Not Meet Requirements
The DS-160 photo uploader will sometimes accept photos that do not actually meet requirements, only for the rejection to come later. Use a professional photographer familiar with US visa photo specifications or use a reputable online tool. The most common photo errors are: colored background, glasses in the photo (not permitted since 2016), image taken more than six months ago, and heavy shadow on the face or background.
Mistake 5 — Not Saving the Application ID
The DS-160 times out after a period of inactivity. If you lose your Application ID, you cannot retrieve your application and must start again from scratch. Write down the Application ID as soon as you open the form. Keep it safe until after your visa interview. You will also need it if you ever need to update your application.
DS-160 Photo Requirements – Everything You Need to Know
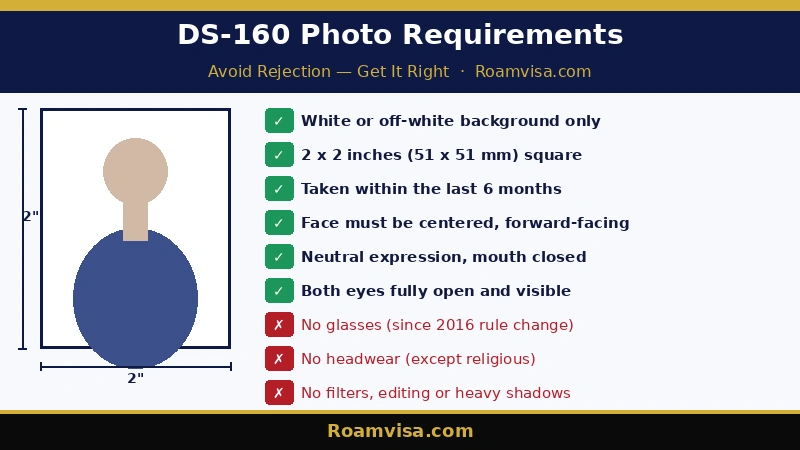
DS-160 US Visa Photo Requirements 2026 – Dos and Don’ts | Roamvisa.com
The photo you upload to the DS-160 is used to create your visa record and is matched against you at the consulate interview and at US ports of entry. Getting it right avoids unnecessary delays.
Required: White or off-white plain background. 2×2 inches (51x51mm) square format. Taken within the last 6 months. Face centered and forward-facing. Neutral expression with mouth closed. Both eyes open and clearly visible. Natural skin tone, no heavy filters.
Not permitted: Glasses of any kind, even prescription — this rule changed in 2016 and many applicants are still unaware. Headwear of any kind except for religious purposes, in which case a letter explaining the religious requirement is needed. Heavy shadows on the face or background. Photo editing, beauty filters, or color correction.
Roamvisa.com recommends getting your visa photo taken at a professional studio that specifically offers US visa photos. Mention the DS-160 requirements. Review the photo before leaving the studio. You need both a digital copy for the online form and a physical printed copy for the consulate interview.
After Submitting the DS-160 – What Happens Next

Once you submit the DS-160, you will receive a confirmation page with a barcode. Print this page and keep it safe. You must bring the printed confirmation page to your visa interview. You cannot attend the interview without it.
The DS-160 submission is just one step in the US visa application process. After submitting the form, Indian applicants need to pay the visa application fee (currently USD 185 for B1/B2), schedule a visa interview appointment through the VFS or US Embassy portal, and prepare supporting documents for the interview.
Documents to bring to the interview: DS-160 confirmation page (printed), valid passport and all old passports, visa fee payment receipt, appointment confirmation letter, passport-sized photos meeting DS-160 requirements, financial documents (bank statements, IT returns), employment or enrollment proof, supporting documents relevant to your visa purpose.
At the interview, a consular officer will review your DS-160 responses and ask questions based on them. Answer consistently with what you filled in the form. If you realize you made an error on the DS-160 after submitting, you can create a new DS-160 with corrected information. Bring both copies to the interview and inform the consular officer of the correction.
Frequently Asked Questions
1. Can I edit the DS-160 after submitting it?
You cannot edit a submitted DS-160. However, you can fill out a new DS-160 with corrected information. If you discover an error before your interview, create a new form, submit it, and bring both the original and corrected confirmation pages to the interview.
2. How long does it take to fill out the DS-160?
Plan for 60 to 90 minutes if you have all your documents ready. The form has roughly 40 to 50 screens depending on your answers. Some sections like employment history and previous travel take more time if your background is complex.
3. What should I enter for social media on the DS-160?
Since 2019, the DS-160 requires you to provide social media usernames for platforms you have used in the last five years. This includes Facebook, Instagram, Twitter/X, LinkedIn, YouTube, and others. Enter your usernames honestly.
4. My DS-160 timed out and I lost my application. What do I do?
If you saved your Application ID, you can retrieve your application by entering the ID on the DS-160 start page and selecting Retrieve an Application. This is why Roamvisa.com emphasizes saving the Application ID immediately.
5. Do children need their own DS-160?
Yes. Every person applying for a US visa, including infants and young children, needs their own DS-160 form. Parents fill out the form on behalf of their minor children. The child’s own passport details are used.